Wednesday, January 22, 2025

YouTube 5.1 Channel Audio Fail in Browsers

Ignore any blog posts or YouTube videos that claim to show you how to play 5.1 surround from YouTube videos in a browser. They don’t work.

As of January, 2025, Chrome, Edge, and Safari all play multichannel audio just fine without any special settings. Try the audio tests yourself on this page, after you’ve configured your multichannel audio device to work with Windows 10/11 or Mac OS (see instructions below):


Chrome and Edge play all of the audio files properly. Safari plays the first and third one (HE-AAC bitstream and AAC bitstream) but the rear channels don’t play on the second one (Original Wave File). 

YouTube, however, does not play multichannel audio in Chrome, Edge, or Safari browsers, and no option appears in the settings to select any other audio format like it does in the YouTube App on Google TV and other streaming devices. Try it yourself with this YouTube video encoded in 5.1 surround:

(Balu - Relaxing in Nature 4K channel)

The YouTube video does play 5.1 surround in the YouTube App on Google TV and Amazon Fire TV Stick 4K and 4K Max, which I have verified. My setup has HDMI ARC going to a Pioneer 7.1 receiver. It probably plays on Apple TV and Roku TV sticks as well, but I don’t have those to test.

Register feedback with YouTube. Maybe they’ll address this oversight. It’s a shame it doesn’t work because Google develops both the Chrome browser and YouTube. I suspect they don’t use the multichannel capability built into the Chrome and Edge browsers because they use their own audio API and it isn’t a priority because not a lot of people have multichannel audio devices connected to their computers.

Windows 10 and 11 Multichannel Audio Device Configuration


Go to the Sound Control Panel or Manage Audio Devices (they are the same thing). There are a few ways to get there.

- Right-click the sound icon in the taskbar and select “Open Sound settings” or do a Windows Search for “Sound settings”). Select “Sound Control Panel” on the right. If it’s not visible, drag the dialog larger until you see it.
- Or do a Windows Search for “Control Panel.” In the “Search Control Panel” box, enter “Manage audio devices” and select the “Manage audio devices” link under Sound.

Under the Playback tab, select your multichannel audio device and click the Configure button. Select 5.1 Surround and the Next button. Check the boxes next to all the speakers you have. Test the speakers by clicking on the icon for each one. Click Next and set the full-range speakers. If you have big speakers in front but not in back, select just the front ones as full-range. If they’re all the same size, select them all. Click Next and Finish and OK to save your settings.

Be sure to select the multichannel audio device as your output device. Right-click the sound icon in the taskbar, Select “Open Sound settings,” and make sure “Choose your output device” shows the multichannel audio device.


Mac OS 15 (Sequoia) Multichannel Audio Device Configuration


Go to Audio MIDI Setup by doing a Spotlight search (Cmd + Spacebar) for “Audio MIDI Setup” or go to the Finder menu > Go > Utilities > Audio MIDI Setup.

Find the multichannel audio (Output) device and set the Format to the number of channels you will use. For 5.1, set it to 6-channel. Select the “Configure Speakers...” button. Set Configuration to something like 5.1. Test the speakers by clicking to icon on each channel. Click Done.

Be sure you are using the multichannel audio device you set up as your audio output.

Tuesday, November 12, 2024

DBeaver vs. SQL Developer: DBeaver fail!

DBeaver claims to be the best database editor. Thanks to some bad UI, something as simple as switching the database schema in the SQL editor is impossible. This is one of the most common activities for anyone using a database manager and SQL editor. You want to run your saved SQL script against a different database or schema. In SQL Developer, this is as simple as can be. Just select the different schema from the dropdown. In DBeaver, you can't. Select the database displayed at the top of the editor by double-clicking or pressing Ctrl+0. It displays a popup that maddeningly shows all the other schemas but you can't actually select them. I'm not sure why there is a popup showing the other schemas in DBeaver. You can see them all in the database navigator in the sidebar. It seems the popup was designed to allow selecting a different schema but there are no buttons, no instructions explaining how to select a different schema, and apparently no functionality in this popup other than to see the databases that you can't select. They sit there and taunt you. It should be as simple as clicking on one and selecting a button like "Select" or even double-clicking on one to select it, but no buttons appear and you can click until your fingers are sore and nothing happens. For the complete failure to implement the most basic and common functionality, DBeaver earns a massive fail.

Update: it turns out that you can select a different database schema in the "Choose catalog/schema" dialog that pops up when you select it at the top of the editor window or press Ctrl+0. Click on the database in the left pane then double-click on the schema in the right pane, which closes the dialog and selects the other database.


This is about as bad as UI gets. No buttons, no titles at the top of the panes describing what they are, no hints as to what this page does or how to select a different database and schema. Clearly designed by a software engineer with a penchant for using Easter Eggs instead of useful UI. Obviously not designed by a UX person. Still a massive fail for DBeaver, even though the ability to switch databases is technically there. It just requires trying everything under the sun to discover the Easter Egg embedded in this page. Utterly awful.

Friday, February 28, 2020

Set Cmder (ConEmu) console emulator to open new tab in current directory with Bash shell

Windows is a truly bad operating system for almost everything except games. Unfortunately sometimes we have to use it for web development. If you're coming from a Linux/Mac environment, the operating systems of choice for web development because Linux servers dominate the Internet, the command line options in Windows are barbaric. The Windows developers have finally seen the light—after more than 20 years—and are working on incorporating native Linux with the Windows Subsystem for Linux project.

In the meantime, a popular console emulator that mimics Linux on Windows is Cmder, which is running ConEmu under the covers. I recommend downloading the Full version that includes Git for Windows since most developers are using Git and GitHub for project version control.

Cmder gives you back the the most common, familiar Linux commands. If you've been using the MacOS Terminal, you're used to opening a new tab in the current working directory with Cmd+T. Unfortunately Cmder doesn't do this be default and figuring out how to do it is maddeningly difficult. Thanks to this tip, I will explain how to do it.

ConEmu offers several choices for consoles, like the old-school cmd, the newer PowerShell, and Bash. I use {Bash::Git bash} as my preferred console.

You have a lot of control of the commands it runs when it opens a new window. You can find them under Settings (Win+Alt+P) > Startup and Settings > Startup > Tasks.

To use hotkey Ctrl+T to open a new tab with the Bash shell in the current directory, rather than the default directory:
  1. Go to Settings > Startup > Tasks
  2. Select the {Bash::Git bash} option
  3. Set the Hotkey to Ctrl+T
  4. Modify the command to start with -new_console:d:"%CD%"
  5. Save settings
The d: option sets the startup directory and the "%CD%" option uses the current directory.


In order for it to read the current directory into environment variable %CD%, you have to enable it in your .bash_profile or .bashrc startup script. In ~/.bash_profile add this:

if [[ -n "${ConEmuPID}" ]]; then
  export PROMPT_COMMAND='ConEmuC -StoreCWD'
fi


See also:

Cmder documetation on GitHub
Cmder wiki
ConEmu documentation

Monday, December 9, 2019

Set zsh (zshell) colors for ls command

Catalina uses zsh (zshell) instead of the old bash or (even older) sh. To set colorized display of files and directories when using the ls command, modify ~/.zprofile or ~/.zshrc with something like:

export CLICOLOR=1
export LSCOLORS=CxFxExDxBxegedabagaced

When you run the ls command, it will display the files colorized according to their type like this:


Setting CLICOLOR to 1 enables colorization. Setting LSCOLORS to the string shown sets the colors for the different file types.

For a detailed explanation of the attributes and colors and how they are set, see:

How to enable colorized output for ls command in MacOS X Terminal


Set zsh (zshell) prompt in Mac OS Catalina terminal

Catalina uses zsh (zshell) instead of the old bash or (even older) sh. To set the command prompt, modify ~/.zprofile or ~/.zshrc with something like:


#--------------------ZSH script commands--------------------#
#  %B  Bold on
#  %b  bold off
#  %F  color on, %F{green} or %F{2}
#  %f  color off
#  %D  date with strftime options in {}
#      %a  weekday 3-letter abbreviation (Mon)
#      %x  locale date (09/30/13)
#      %X  locale time (07:06:05)
#  %n  user
#  %m  machine
#  %/  directory path
#  %#  show % unless elevated privileges (sudo), then show #
#  $'\n'  newline
#
#-----------------------------------------------------------#

PROMPT="%B%F{green}%D{%a %x %X} %F{red}%n%F{white}@%F{cyan}%m %F{yellow}%/%f %#"$'\n'"> "

This will generate a prompt that looks like this, with the command prompt on the next line down:


You can use either PS1 or PROMPT. PS1 may be set in /etc/zshrc and it will override your setting. To disable it, edit /etc/zshrc and comment out the PS1 line. You may have to use sudo vim and write your changes with w! (and exit with q!) because the permissions may be set to read-only for everyone.

For a detailed explanation of setting the prompt in zsh, see:

zsh Prompt Expansion
Customizing the zsh prompt

For a list of 256 colors whose numeric values you can use in place of red, green, yellow, blue, magenta, cyan, and white, see:

256 Colors Cheat Sheet

Here's a strftime reference for options to include with %D for date and time formatting:

Python's strftime directives


Monday, May 6, 2019

Key event handlers in Vue

What I learned about setting event handling for keys in Vue is:
  1. Add the v-on directive (shorthand is @) to the element (for example; @keyup, @keydown).

  2. Set focus on the element (add the property tabindex="0").

  3. To set focus programmatically with .focus(), if the action or event that initiated the change in focus causes the DOM to change (it usually does) you must set focus using $nextTick to wait for the DOM to update first.

<div class="notify-item-list" v-for="(entry, index) in category.entries" :key="entry.id">
    <a href="#" @click="selectItem(category.entries, index)" class="text-black" :class="{ 'text-bold': isUnread(entry) }">{{ entry.title }}</a>
    <div id="notification-modal" tabindex="0" ref="notifyModal" @keyup="navKeys" class="item-detail modal" :class="{ 'is-active': showItemDetail(entry) }">

methods: {
    selectItem: function ( entries, index ) {
        this.selectedItemIndex = index;
        this.$nextTick( () => {
            let input = this.$refs.notifyModal[index];
            input.focus();
        }),
    navKeys: function ( e ) {
        switch( e.keyCode ) {
            case 27: // esc
                this.hideItemDetail();
                break;
            case 37: // left
                this.prevNotificationDetail(this.category.entries);
                break;
            case 39: // right
                this.nextNotificationDetail(this.category.entries);
                break;
        }
    }
}


It’s a little more involved when multiple similar elements are created with the v-for directive, but you can simplify it by adding the ref="whatever" attribute, then use the index of the array to find the right object and its $refs.whatever, for example this.$refs.whatever[index]. Here’s a discussion of how to do this with v-for:

https://laracasts.com/discuss/channels/vue/vue-set-focus-to-input-created-by-v-for?page=1

See the 4th, 5th, and 6th replies by Kazuya.Gosho, MacPrawn and lukas.pierce. The last one was the most helpful. Anyway, it works like a charm. Feels a little kludgy, but considering how the user is interacting with the DOM it makes sense.

Wednesday, July 25, 2018

Mimic PC NumLock on Mac with 101/102 Key PC Keyboard

I use a MacBook Pro with a leftover Dell 102-key PC keyboard. For almost everything it works great. Even the volume keys work. However, the NumLock doesn't behave the way it does on a PC.

I mostly use the number pad on the right to move the cursor around for editing. It makes editing really fast because the cursor keys are easily reached; just like using the A,S,D,W keys for navigating in a video game. I rarely use the number pad for entering numbers; just when I have a long series of number I want to rapidly input. If it's only one or two numbers, I use the number keys at the top of the keyboard. Using the NumLock key to switch back and forth between cursor control and number entry is extremely handy, but the Apple keyboard doesn't have this feature.

Karabiner to the rescue


I found a popular keyboard-mapping utility for Mac called Karabiner. It allows me to remap the keyboard for specific keyboards, so I can map the keypad 0-9 keys to cursor movement for just the Dell keyboard; however I can't quickly switch back to the default functions.

Map NumLock to toggle between keyboard profiles


The solution is to create 2 keyboard profiles. I modified the "Default profile" to map the keypad keys for cursor movement and created another profile, "NumLock On" that reverts to the original function of the keypad keys for number entry. Then I mapped the NumLock key to run a shell_command calling Karabiner from the command line and loading the other profile. You can see the way it's set up in ~/.config/karabiner/karabiner.json. Here is the relevant code:
    {   
        "from": {
            "key_code": "keypad_9"
        },
        "to": {
            "key_code": "page_up"
        }
    },
    {
        "from": {
            "key_code": "keypad_num_lock"
        },
        "to": {
            "shell_command": "'/Library/Application Support/org.pqrs/Karabiner-Elements/bin/karabiner_cli' --select-profile 'NumLock On'"
        }
    },
    {
        "from": {
            "key_code": "keypad_period"
        },
        "to": {
            "key_code": "delete_forward"
        }
    }
The key_code, "keypad_num_lock", in the profile, "Default profile", is mapped to a "shell_command" which runs the Karabiner command-line interface (cli) and selects the "NumLock On" profile.

In the "NumLock On" profile, keypad_num_lock also runs the Karabiner cli but selects the "Default profile", like this:
     {
         "from": {
             "key_code": "f12"
         },
         "to": {
             "consumer_key_code": "volume_increment"
         }
     },
     {
         "from": {
             "key_code": "keypad_num_lock"
         },
         "to": {
             "shell_command": "'/Library/Application Support/org.pqrs/Karabiner-Elements/bin/karabiner_cli' --select-profile 'Default profile'"
         }
     }
For more on Karabiner, see:

Karabiner Manual

Karabiner JSON Reference Manual

Wednesday, September 27, 2017

View or Suppress Logback Status

Logback always shows status statements if there are configuration errors


Logback will log its own status statements to the console if you have any configuration problems resulting in WARN or ERROR messages, which will also show INFO messages. The Logback levels are, from lowest level to highest level:

TRACE < DEBUG < INFO < WARN < ERROR

(See Logback Architecture: error levels for details.)

See Logback status statements


To see Logback's status statements in the console (standard out) regardless of whether or not there are any configuration errors, set the debug attribute to true in the configuration element.
  <configuration debug="true">
    ...
  <configuration>

Suppress Logback status statements


To suppress display of Logback's status statements to the console, omit the debug attribute in the configuration element or set it to false. This will not suppress status statements if there are configuration problems with Logback.
  <configuration>
    ...
  </configuration>
If there is no debug attribute or it's set to false and you see Logback status statements, fix the problems causing the WARN or ERROR statements and the statements will no longer display.

If you can't fix the configuration problem but want to suppress the status statements, you can configure an alternate StatusListener like NopStatusListener to completely remove status statements.
  <configuration>
    <statusListener class="ch.qos.logback.core.status.NopStatusListener" />
    ...
  </configuration>
See also:

Logback Configuration: Automatic printing of status messages in case of warning or errors
Logback Configuration: Show status data
Logback Configuration

Wednesday, March 1, 2017

Use swagger-codegen to generate Java code from Swagger Spec

Swagger is the most popular standard for describing RESTful APIs. The Swagger Specification (formerly known as the OpenAPI Specification) is a JSON or YAML document that describes an API's endpoints, HTTP methods (GET, PUT, POST, etc.), possible responses and fields, possible errors, etc.

Swagger has code generators that will read a Swagger Specification and generate code in a variety of programming languages to consume the API. This saves a lot of time. The command line code generator is a Java Jar file. You need Java 7 or higher installed to run it. There is also a Maven plugin for Java projects that can generate the code for you as part of your project build process.


You can get help from the command line utility by running:
java -jar swagger-codegen-cli.jar help

which shows:
The most commonly used swagger-codegen-cli commands are:
    config-help   Config help for chosen lang
    generate      Generate code with chosen lang
    help          Display help information
    langs         Shows available langs
    meta          MetaGenerator. Generator for creating a new template set...
    version       Show version information

See 'swagger-codegen-cli help <command>' for more information on a specific command.

If you want detailed help about the generate command:
java -jar swagger-codegen-cli.jar help generate

The code generator can use a local Swagger doc or one hosted on a website. There is a quirk about how it handles URLs.

If the Swagger doc path is a URL and the URL has query parameters in it separated by an ampersand (&), you have to modify the URL slightly depending on whether you are using the command-line utility or the Maven plugin.

Command Line Utility (CLI)


When using swagger-codegen-cli.jar, enclose the -i (or --input-spec) parameter in double quotes if the URL has query parameters, like this:
-i "https://my.api.com/store/api-docs?provider=USER/me&name=MyNewService&version=v1"

For example:
java -jar swagger-codegen-cli.jar generate -l java --library jersey1 -o my/dir --model-package my.model.svc -i "https://my.api.com/store/api-docs?provider=USER/me&name=MyNewService&version=v1"

Maven swagger-codegen-maven-plugin


When using the Maven plugin, substitute &amp; for the & character if the URL has query parameters, like this:
https://mysite.com?color=red&flavor=sweet

Right: ?color=red&amp;flavor=sweet
<configuration>
  <inputSpec>https://mysite.com/api?provider=USER/me&amp;name=MyGreatService&amp;version=v1</inputSpec>
</configuration>

Wrong: ?color=red&flavor=sweet
<configuration>
  <inputSpec>https://mysite.com/api?provider=USER/me&name=MyGreatService&version=v1</inputSpec>
</configuration>

pom.xml

<build>
  <plugins>
    <plugin>
      <groupId>io.swagger</groupId>
      <artifactId>swagger-codegen-maven-plugin</artifactId>
      <version>2.2.1</version>
      <executions>
        <execution>
          <goals>
            <goal>generate</goal>
          </goals>
          <configuration>
            <inputSpec>https://my.api.com/store/api-docs?provider=USER/me&name=MyGreatService&version=v1</inputSpec>
            <language>java</language>
            <configOptions>
              <dateLibrary>joda</dateLibrary>
            </configOptions>
            <library>jersey1</library>
            <modelPackage>my.model.svc</modelPackage>
          </configuration>
        </execution>
      </executions>
    </plugin>
  </plugins>
</build>

Monday, February 6, 2017

Pretty Print JSON and XML from Mac OS Command Line

JSON


Must have Python 2.6 or higher version installed.

From Clipboard


After copying unformatted JSON to clipboard (ctrl+c), run this:

pbpaste | python -m json.tool

From File


After saving unformatted JSON to a file called, for example, ugly.json, run this to write it to a file called pretty.json:

cat ugly.json | python -m json.tool > pretty.json

XML


From Clipboard


After copying unformatted XML to clipboard (ctrl+c), run this:

pbpaste | xmllint --format -

pbpaste | xmllint --format -

From File


After saving unformatted XML to a file called, for example, ugly.xml, run this to write it to a file called pretty.xml:

cat ugly.xml | xmllint --format -o pretty.xml -


Monday, July 11, 2016

Signing a PDF Document With Adobe Reader

You can sign a PDF document using a signature created by Adobe Reader or you can scan in your actual signature and re-use it for any documents that need signing.  You can even create multiple versions of your signature.  Here's how.

1. Download and install Adobe Reader if you haven't already.

2. Open the document in Adobe Reader and select "Fill & Sign" in the right sidebar.


3. Select "Sign" in the toolbar at the top.  If you haven't created a signature yet, it will prompt you for one.  Let's assume you haven't created one yet.


4. Write a signature.  Using the selections at the top, you can type it, draw it with your mouse, provide a scanned image of your signature, or even use your laptop camera to scan one in that you wrote on a piece of paper.  When you're done, select "Apply".


5. Your signature will appear on the document.  Move it where you want with your mouse and click when done.


6. A box will show around the signature with a handle in the lower-right corner that you can drag to make the signature bigger or smaller.  When it's sized they way you want, click somewhere outside the box.  Don't worry if you don't get it right.  You can adjust the size and location by clicking on the signature again.  Changing the location is as simple as placing the mouse cursor inside the box until a cross-haired cursor appears, then clicking and dragging the signature where you want.


7. Once you have clicked outside the box another cursor appears allowing you to place printed text anywhere on the page, for example a printed name or date.  Move the cursor where you want to type and click.  A box will appear for you to enter text into.  You can change the size of the text by clicking on the smaller or larger "A" above your text.


8. When everything looks right, save the document or select Save As to save it as another name.


9. Now you can send an email back to the requestor and attach the saved document with your signature.

Creating PDF Documents With Signatures

Creating a PDF document with a place for a signature is easy.  This example shows how to do it with Microsoft Word.  It's just as easy in Google Docs.  Just 3 steps.

1. Create the document in Microsoft Word or some other word processor that can save as PDF.  You can use Google Docs too.


2. Save it as a PDF.

In Word, navigate to Save As... > PDF.


In Google Docs, navigate to File > Download as > PDF Document (.pdf)

3. Email it with instructions on how to sign it.

Wednesday, March 30, 2016

Not Great: Yahoo Developer Network (YDN)

Here are some reasons why:


1. The Yahoo Developer documentation website takes forever (minutes) to display, if it even does. Mostly it doesn't and this is what you'll see instead:


Maybe they could spin up a second server to host their website so more than a dozen people can access it at a time. Or is that more than the number of developers interested in building Yahoo apps?

2. You can't set or change API permissions on your application after you've created it. This is what the page looks like if you haven't selected API permissions when you set it up.


When you select the "Update" button, it says "updating..." then comes back with the happy message "Your application has been successfully updated." Updated with what? It never gave me any options to select. It's not a big deal to delete the app and start over again, but it's not obvious either.

3. No support. There doesn't seem to be any place to let them know that their YDN server (servers?) is (are?) not displaying content, nor do they ask for feedback. There's a FaceBook page and a Twitter account where you could presumably post a message or a tweet, but really?

Build stuff, ignore feedback...where have I seen that before? Oh yeah, the big Detroit automakers until the Japanese showed them how to build better cars. Buy some copies of The Machine That Changed The World and learn about lean manufacturing, Yahoo. Better yet, read up on Agile Development; you know, that thing that all the successful software businesses are doing?

Hmmm... I wonder why Yahoo is divesting itself of its web businesses.

Friday, March 25, 2016

Show Hidden Folders in Finder

Show Specific Folder


Mac OS X hides many directories so they can't be seen in Finder even though you can navigate to them in Terminal.
To make a hidden directory visible in Finder, open a Terminal window and enter:

sudo chflags nohidden DIRECTORYNAME

DIRECTORYNAME is the directory you want to unhide.  This will also unhide all child directories of that directory.

To hide the directory from Finder:

sudo chflags hidden DIRECTORYNAME

For more, see How to view Root directory and subdirectories in Finder?

Show All Hidden Folders


You can show all hidden folders in Finder by opening a Terminal window and entering the following:

defaults write com.apple.finder AppleShowAllFiles YES
killall Finder

The "killall Finder" command kills finder which then restarts automatically.  The alternative to issuing this command is logging out and logging in again.

To hide them all again:

defaults write com.apple.finder AppleShowAllFiles NO
killall Finder

You can also use AppleShowAllFiles TRUE or FALSE.

For more, see How to show hidden files and folders in Mac OS X Finder


Thursday, February 18, 2016

Find Tomcat Version

The Tomcat browser user interface displays the version at the top.  If it's running locally, you can usually reach it at localhost:8080.


From Command Line


To find the version of Tomcat from the command line:
java -cp {tomcat home directory}/lib/catalina.jar org.apache.catalina.util.ServerInfo
The result will look like:
Server version: Apache Tomcat/7.0.52
Server built:   Feb 13 2014 10:24:25
Server number:  7.0.52.0
OS Name:        Mac OS X
OS Version:     10.11.3
Architecture:   x86_64
JVM Version:    1.7.0_75-b13
JVM Vendor:     Oracle Corporation
If Tomcat is running, you can use this script to show its version.  It looks for Tomcat among the running processes and uses the command line options specified (catalina.base or catalina.home) when it was started to find the home directory.
#!/bin/bash
# If Tomcat is running, display its version.
#
# This script looks for Tomcat among running process and locates its
# home directory from the command line options specified when it was
# started, either in catalina.base or catalina.home.
#
# Trick: use grep "[c]atalina.base" and awk "[c]atalina.base" so the
# regular expression won't match itself and return 2 results.
# "grep [c]atalina.base" does not match the string "grep [c]atalina.base".
# Try doing "ps -ef | grep catalina.base" and see that it returns 2 results.
# Try doing "ps -ef | grep [c]atalina.base" and see that it returns 1 result.

TOMCAT_DIR=`ps -ef | grep "[c]atalina.base" | awk -F "[c]atalina.base=" '{print $2}' | cut -d ' ' -f 1`
if [ -z "$TOMCAT_DIR" ]; then
    TOMCAT_DIR=`ps -ef | grep "[c]atalina.home" | awk -F "[c]atalina.home=" '{print $2}' | cut -d ' ' -f 1`
    if [ -z "$TOMCAT_DIR" ]; then
        echo "Tomcat does not appear to be running."
        echo -e "If you know where the Tomcat home directory is, you can find the version by running:\n"
        echo -e "java -cp {tomcat home directory}/lib/catalina.jar org.apache.catalina.util.ServerInfo\n"
        exit 1
    fi
fi
echo -e "Tomcat is running.\n"
echo -e "Home directory: $TOMCAT_DIR\n"
java -cp $TOMCAT_DIR/lib/catalina.jar org.apache.catalina.util.ServerInfo

Remember to make the file executable with "chmod a+x filename".

Thursday, February 4, 2016

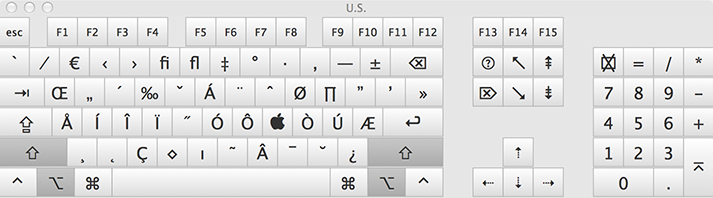
Apple Mac Keyboard

MacBook Pro Layout (U.S.)


You can see these layouts on your Mac using Show Keyboard Viewer in the keyboard menu.  See "Add Keyboard Layouts" below for how to set this up.

Default MacBook Pro U.S. Keyboard Layout

shift pressed

fn key pressed

option (alt) key pressed

shift + option (alt) pressed


104-Key Layout (U.S.)

Default Apple 104-Key U.S. Layout 

shift pressed

option (alt) pressed

shift + option (alt) pressed


Add Keyboard Layouts


To add other keyboard layouts in your default language:

1. Go to System Preferences > Keyboard.
2. On Input Sources tab, select + to add another keyboard layout.


3. To simplify switching keyboard layouts when editing, mark the "Show Input menu in menu bar" check box. This will show a language and keyboard icon in the Status Menu (right side of menu bar at the top). Click on it to switch keyboard layouts and see other options.


4. To show the layout of keys in case you forget, go to the Keyboard tab and mark the "Show Keyboard & Character Viewers in menu bar" checkbox. When you click on the keyboard layout icon in the Status Menu you will see the "Show Character Viewer" and "Show Keyboard Viewer" options.


Keyboard Layout for Another Language


1. Go to System Preferences > Language & Region.


2. Select + to add another language.
3. Once you select a language and choose which language will be the default, you will be asked to add an input source; the keyboard layout you will use for that language.


4. If you select the "Keyboard Preferences" button (see step 1 image above) you can add or remove different keyboard options for that language.
5. You can choose from different Input modes and modify Caps lock action and Typing method among other options.


6. To make it easier to switch between language keyboards, select the "Show input menu in menu bar" checkbox.
7. The added language keyboard will show up in the Status Menu with any options you checked in Keyboard Preferences.


Now you can switch to a different language and keyboard by simply selecting it from the status menu.

Monday, February 1, 2016

Jackson UnrecognizedPropertyException

For complicated APIs, I use the XJC binding compiler included with JAXB to generate Java classes using the XSD schema of the XML results of a web service.  This is a huge time saver.

For JSON results, there isn't a standard binding compiler to generate Java classes but since JSON and XML are almost interchangeable, I generate the Java classes the same way and fix the differences after the classes have been compiled.

One common error I get is an "unrecognized field" because of the slight differences between XML and JSON representations of data.

For example, I got this error:
com.sun.jersey.api.client.ClientHandlerException: org.codehaus.jackson.map.exc.UnrecognizedPropertyException: Unrecognized field "geonames" (Class org.learn.ws.model.jaxb.api.geonames.org.postal.countryinfo.types.GeonamesType), not marked as ignorable
when unmarshalling this JSON:
{
  "geonames": [
    {
      "numPostalCodes": 7,
      "maxPostalCode": "AD700",
      "countryCode": "AD",
      "minPostalCode": "AD100",
      "countryName": "Andorra"
    },
    {
      "numPostalCodes": 20260,
      "maxPostalCode": "9431",
      "countryCode": "AR",
      "minPostalCode": "1601",
      "countryName": "Argentina"
    }
    ...lots more rows...
  ]
}
to this GeonamesType class:
import javax.xml.bind.annotation.XmlAccessType;
import javax.xml.bind.annotation.XmlAccessorType;
import javax.xml.bind.annotation.XmlType;
import java.util.ArrayList;
import java.util.List;

@XmlAccessorType(XmlAccessType.FIELD)
@XmlType(name = "geonamesType", propOrder = {
    "country"
})
public class GeonamesType {

    protected List<countrytype> country;

    public List<countrytype> getCountry() {
        if (country == null) {
            country = new ArrayList<countrytype>();
        }
        return this.country;
    }
}
and this CounryType class:
@XmlAccessorType(XmlAccessType.FIELD)
@XmlType(name = "countryType", propOrder = {
    "countryCode",
    "countryName",
    "numPostalCodes",
    "minPostalCode",
    "maxPostalCode"
})
public class CountryType {

    @XmlElement(required = true)
    protected String countryCode;
    @XmlElement(required = true)
    protected String countryName;
    @XmlElement(required = true)
    protected String numPostalCodes;
    @XmlElement(required = true)
    protected String minPostalCode;
    @XmlElement(required = true)
    protected String maxPostalCode;

    public String getCountryCode() {
        return countryCode;
    }

    public void setCountryCode(String value) {
        this.countryCode = value;
    }

    public String getCountryName() {
        return countryName;
    }

    public void setCountryName(String value) {
        this.countryName = value;
    }

    public String getNumPostalCodes() {
        return numPostalCodes;
    }

    public void setNumPostalCodes(String value) {
        this.numPostalCodes = value;
    }

    public String getMinPostalCode() {
        return minPostalCode;
    }

    public void setMinPostalCode(String value) {
        this.minPostalCode = value;
    }

    public String getMaxPostalCode() {
        return maxPostalCode;
    }

    public void setMaxPostalCode(String value) {
        this.maxPostalCode = value;
    }

}
The GeonamesType class is the root-level class generated and annotated automatically with the JAXB XJC shell script. For more on XJC, see http://www.thoughts-on-java.org/generate-your-jaxb-classes-in-second/.

The XJC shell script is used to generate Java classes from an XSD schema file. The XSD schema file can be generated automatically from sample XML with any number of online XML schema generators, for example this one: http://www.freeformatter.com/xsd-generator.html.

The error is telling me that the root-level node in the returned JSON, "geonames", doesn't have a correspondingly-named property in the root-level class, GeonamesType.  In the class, its name is "country".  The class was generated with xjc from the XML version of the result returned from the web service, which looks like this:
<?xml version="1.0" encoding="UTF-8"?>
<geonames>
    <country>
        <countryCode>AD</countryCode>
        <countryName>Andorra</countryName>
        <numPostalCodes>7</numPostalCodes>
        <minPostalCode>AD100</minPostalCode>
        <maxPostalCode>AD700</maxPostalCode>
    </country>
    <country>
        <countryCode>AR</countryCode>
        <countryName>Argentina</countryName>
        <numPostalCodes>20260</numPostalCodes>
        <minPostalCode>1601</minPostalCode>
        <maxPostalCode>9431</maxPostalCode>
    </country>
    ...lots more rows...
</geonames>
In the XML version, geonames is a list of country objects, which is how it is represented in the Java classes. In the JSON version, geonames is an array (list) of objects, but the objects aren't named. I could fix this by renaming "country" in the GeonamesType class to "geonames" like this:
@XmlAccessorType(XmlAccessType.FIELD)
@XmlType(name = "geonamesType", propOrder = {
    "geonames"
})
public class GeonamesType {

    protected List<countrytype> geonames;

    public List<countrytype> getCountry() {
        if (geonames == null) {
            geonames = new ArrayList<countrytype>();
        }
        return this.geonames;
    }
}
This solves the problem for JSON results, but it doesn't work anymore for the XML results.

Use Same Classes With XML And JSON


By modifying the original GeonamesType class (at the top) with a Jackson annotation that is specific to JSON, it is possible to use the same Java classes for both XML and JSON versions of the results.

Just add the @JsonElement annotation to the country property to tell Jackson that the name of the element in the JSON result will be "geonames", not "country", like this:
import org.codehaus.jackson.annotate.JsonProperty;
import javax.xml.bind.annotation.XmlAccessType;
import javax.xml.bind.annotation.XmlAccessorType;
import javax.xml.bind.annotation.XmlType;
import java.util.ArrayList;
import java.util.List;

@XmlAccessorType(XmlAccessType.FIELD)
@XmlType(name = "geonamesType", propOrder = {
    "country"
})
public class GeonamesType {

    @JsonProperty(value = "geonames")
    protected List<countrytype> country;

    public List<countrytype> getCountry() {
        if (country == null) {
            country = new ArrayList<countrytype>();
        }
        return this.country;
    }
}
Now the classes work for both the XML and JSON results as shown above.

Friday, January 15, 2016

Set OS X Environment Variables

There are several ways to set environment variables for Mac OS X:
  • For command line applications running in a console / terminal
  • For GUI applications run from Spotlight (desktop)
  • For both command line and GUI applications

Here is a Stack Overflow thread discussing how to set environment variables:
Setting environment variables in OS X?

Set environment variables for command line applications in terminal


Edit .bash_profile or .profile or .bashrc in your user directory (~ or /Users/username), something like this:
# User specific environment and startup programs
 
PATH=/usr/local/bin:/usr/local/git/bin:$PATH:$HOME/bin
export ORACLE_HOME=/Users/myuser/Oracle/instantclient_11_2
export DYLD_LIBRARY_PATH=$ORACLE_HOME
export LD_LIBRARY_PATH=$ORACLE_HOME
#DYLD_LIBRARY_PATH=/Users/myuser/Oracle/instantclient_11_2/lib
 
export PATH
#export DYLD_LIBRARY_PATH
 
alias ll="ls -l"

Set environment variables for GUI applications


Note: Starting with Yosemite (version 10.10), this method is no longer used.  See the "DEPRECATED AND REMOVED FUNCTIONALITY" at the end when you "man launchctl".

Edit /etc/launchd.conf
sudo vi /etc/launchd.conf
Add environment variables like this:
# Set environment variables here so they are available globally to all apps
# (and Terminal), including those launched via Spotlight.
#
# After editing this file run the following command from the terminal to update
# environment variables globally without needing to reboot.
# NOTE: You will still need to restart the relevant application (including
# Terminal) to pick up the changes!
# grep -E "^setenv" /etc/launchd.conf | xargs -t -L 1 launchctl
#
# See http://www.digitaledgesw.com/node/31
# and http://stackoverflow.com/questions/135688/setting-environment-variables-in-os-x/
#
# Note that you must hardcode the paths below, don't use enviroment variables.
# You also need to surround multiple values in quotes, see MAVEN_OPTS example below.
 
#Java:
setenv JAVA_VERSION 1.7
#Mac OS X JAVA (1.6.0_65) is here:
#setenv JAVA_HOME /System/Library/Frameworks/JavaVM.framework/Home
#setenv JAVA_HOME /System/Library/Java/JavaVirtualMachines/1.6.0.jdk/Contents/Home
 
#JAVA 1.7 is here (see /usr/bin/java*):
setenv JAVA_HOME /Library/Java/JavaVirtualMachines/jdk1.7.0_51.jdk/Contents/Home
 
 
#Maven:
setenv M2_HOME /opt/maven
setenv MAVEN_OPTS "-Xmx1024M -XX:MaxPermSize=512m"
 
#Oracle:
setenv NLS_LANG /Users/myuser/Oracle/instantclient_11_2
#setenv ORACLE_HOME /Users/myuser/Oracle
#setenv DYLD_LIBRARY_PATH /Users/myuser/Oracle/instantclient_11_2
#setenv LD_LIBRARY_PATH /Users/myuser/Oracle/instantclient_11_2
#setenv TNS_ADMIN /Users/myuser/Oracle/instantclient_11_2/network/adminsetenv JAVA_HOME /System/Library/Frameworks/JavaVM.framework/Versions/1.6/Home
 
#Other:
setenv GROOVY_HOME /Applications/Dev/groovy
setenv GRAILS_HOME /Applications/Dev/grails
setenv NEXUS_HOME /Applications/Dev/nexus/nexus-webapp
setenv JRUBY_HOME /Applications/Dev/jruby
You can also set environment variables for applications started by Spotlight from the command line, although they will only be available until the computer is rebooted.  You do it like this:
launchctl setenv M2_HOME /opt/maven
It will be available to GUI applications that launch from Spotlight but will disappear when the computer is shut down.  If you want the environment variables to remain after rebooting edit /etc/launchd.conf.

Set Path


There is only one reliable way to set the path for both the command shell and the GUI.  Modify /etc/paths.
sudo vim /etc/paths

Mac OS X Screen Capture

How to take screen shots:

Capture entire screen: Cmd-Shift-3 (⌘⇧3)

Capture part of screen: Cmd-Shift-4 (⌘⇧4)
  • drag crosshair pointer to select the area
  • hold Shift (⇧) or Option (⌥) while you drag to resize selection
  • to cancel, press Esc before releasing mouse button
Capture specific window: Cmd-Shift-4 (⌘⇧4)
  • press Space bar
  • move camera pointer over window to highlight it, then click
For more flexible options including waiting a specified time to take screenshot, use the Grab app. Access it one of these 3 ways:
  • From Finder window, Applications > Utilities > Grab.app
  • Launchpad > Other > Grab
  • Spotlight, Cmd-Space bar (⌘Space bar) > Grab
See Mac keyboard shortcuts for more.

Maven Setup in IntelliJ IDEA

On Mac OS X

Mac OS X bundles its own version of Maven.  So does IntelliJ.  I installed a third, newer version, which is the one I use from the command line.

When I check which Maven I'm using on the command line ("which mvn") it shows /opt/maven/bin/mvn.

When I check the version ("mvn -v") it shows the Maven home directory is /opt/maven.

By default IntelliJ uses the Mac OS X-installed Maven.  This causes problems when creating a project from existing Maven sources (pom.xml) because it can't find the repository.

If you see numerous errors related to not being able to find or use dependencies when you compile a project with Maven in IntelliJ and you can see the .jar files it should be using are in the local repository (/Users/username/.m2/repository/...) but Maven can't see them, check which Maven it's using.

Navigate to IntelliJ IDEA > Preferences.  Select Build, Execution, Deployment > Build Tools > Maven.  The Maven home directory and version should be the same as the one reported when you do "mvn -v" and the User settings file and Local repository should typically be located under .m2 in your user home directory; for example, /Users/myuser/.m2/settings.xml and /Users/myuser/.m2/repository. If they are not, set them to the one you use.

If the directory is hidden, you can select the "Show Hidden Files and Directories" button.


Now you will be able to select a hidden directory.


For showing hidden files and directories in Finder (outside of IntelliJ), see "Show Hidden Folders / Directories in Finder".

When the maven home directory is selected, IntelliJ will display the version number so you can verify it.


Once Maven is set correctly in IntelliJ all the errors should resolve.

YouTube 5.1 Channel Audio Fail in Browsers

Ignore any blog posts or YouTube videos that claim to show you how to play 5.1 surround from YouTube videos in a browser. They don’t work. A...