Showing posts with label Apple. Show all posts

Monday, December 9, 2019

Set zsh (zshell) colors for ls command

Catalina uses zsh (zshell) instead of the old bash or (even older) sh. To set colorized display of files and directories when using the ls command, modify ~/.zprofile or ~/.zshrc with something like:

export CLICOLOR=1
export LSCOLORS=CxFxExDxBxegedabagaced

When you run the ls command, it will display the files colorized according to their type like this:


Setting CLICOLOR to 1 enables colorization. Setting LSCOLORS to the string shown sets the colors for the different file types.

For a detailed explanation of the attributes and colors and how they are set, see:

How to enable colorized output for ls command in MacOS X Terminal


Set zsh (zshell) prompt in Mac OS Catalina terminal

Catalina uses zsh (zshell) instead of the old bash or (even older) sh. To set the command prompt, modify ~/.zprofile or ~/.zshrc with something like:


#--------------------ZSH script commands--------------------#
#  %B  Bold on
#  %b  bold off
#  %F  color on, %F{green} or %F{2}
#  %f  color off
#  %D  date with strftime options in {}
#      %a  weekday 3-letter abbreviation (Mon)
#      %x  locale date (09/30/13)
#      %X  locale time (07:06:05)
#  %n  user
#  %m  machine
#  %/  directory path
#  %#  show % unless elevated privileges (sudo), then show #
#  $'\n'  newline
#
#-----------------------------------------------------------#

PROMPT="%B%F{green}%D{%a %x %X} %F{red}%n%F{white}@%F{cyan}%m %F{yellow}%/%f %#"$'\n'"> "

This will generate a prompt that looks like this, with the command prompt on the next line down:


You can use either PS1 or PROMPT. PS1 may be set in /etc/zshrc and it will override your setting. To disable it, edit /etc/zshrc and comment out the PS1 line. You may have to use sudo vim and write your changes with w! (and exit with q!) because the permissions may be set to read-only for everyone.

For a detailed explanation of setting the prompt in zsh, see:

zsh Prompt Expansion
Customizing the zsh prompt

For a list of 256 colors whose numeric values you can use in place of red, green, yellow, blue, magenta, cyan, and white, see:

256 Colors Cheat Sheet

Here's a strftime reference for options to include with %D for date and time formatting:

Python's strftime directives


Wednesday, July 25, 2018

Mimic PC NumLock on Mac with 101/102 Key PC Keyboard

I use a MacBook Pro with a leftover Dell 102-key PC keyboard. For almost everything it works great. Even the volume keys work. However, the NumLock doesn't behave the way it does on a PC.

I mostly use the number pad on the right to move the cursor around for editing. It makes editing really fast because the cursor keys are easily reached; just like using the A,S,D,W keys for navigating in a video game. I rarely use the number pad for entering numbers; just when I have a long series of number I want to rapidly input. If it's only one or two numbers, I use the number keys at the top of the keyboard. Using the NumLock key to switch back and forth between cursor control and number entry is extremely handy, but the Apple keyboard doesn't have this feature.

Karabiner to the rescue


I found a popular keyboard-mapping utility for Mac called Karabiner. It allows me to remap the keyboard for specific keyboards, so I can map the keypad 0-9 keys to cursor movement for just the Dell keyboard; however I can't quickly switch back to the default functions.

Map NumLock to toggle between keyboard profiles


The solution is to create 2 keyboard profiles. I modified the "Default profile" to map the keypad keys for cursor movement and created another profile, "NumLock On" that reverts to the original function of the keypad keys for number entry. Then I mapped the NumLock key to run a shell_command calling Karabiner from the command line and loading the other profile. You can see the way it's set up in ~/.config/karabiner/karabiner.json. Here is the relevant code:
    {   
        "from": {
            "key_code": "keypad_9"
        },
        "to": {
            "key_code": "page_up"
        }
    },
    {
        "from": {
            "key_code": "keypad_num_lock"
        },
        "to": {
            "shell_command": "'/Library/Application Support/org.pqrs/Karabiner-Elements/bin/karabiner_cli' --select-profile 'NumLock On'"
        }
    },
    {
        "from": {
            "key_code": "keypad_period"
        },
        "to": {
            "key_code": "delete_forward"
        }
    }
The key_code, "keypad_num_lock", in the profile, "Default profile", is mapped to a "shell_command" which runs the Karabiner command-line interface (cli) and selects the "NumLock On" profile.

In the "NumLock On" profile, keypad_num_lock also runs the Karabiner cli but selects the "Default profile", like this:
     {
         "from": {
             "key_code": "f12"
         },
         "to": {
             "consumer_key_code": "volume_increment"
         }
     },
     {
         "from": {
             "key_code": "keypad_num_lock"
         },
         "to": {
             "shell_command": "'/Library/Application Support/org.pqrs/Karabiner-Elements/bin/karabiner_cli' --select-profile 'Default profile'"
         }
     }
For more on Karabiner, see:

Karabiner Manual

Karabiner JSON Reference Manual

Thursday, February 4, 2016

Apple Mac Keyboard

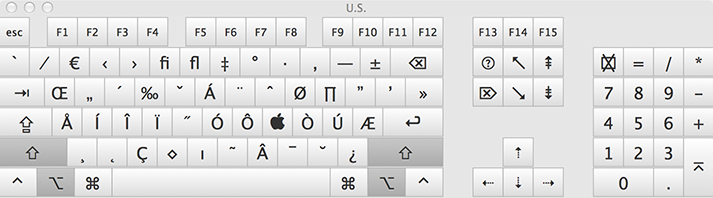
MacBook Pro Layout (U.S.)


You can see these layouts on your Mac using Show Keyboard Viewer in the keyboard menu.  See "Add Keyboard Layouts" below for how to set this up.

Default MacBook Pro U.S. Keyboard Layout

shift pressed

fn key pressed

option (alt) key pressed

shift + option (alt) pressed


104-Key Layout (U.S.)

Default Apple 104-Key U.S. Layout 

shift pressed

option (alt) pressed

shift + option (alt) pressed


Add Keyboard Layouts


To add other keyboard layouts in your default language:

1. Go to System Preferences > Keyboard.
2. On Input Sources tab, select + to add another keyboard layout.


3. To simplify switching keyboard layouts when editing, mark the "Show Input menu in menu bar" check box. This will show a language and keyboard icon in the Status Menu (right side of menu bar at the top). Click on it to switch keyboard layouts and see other options.


4. To show the layout of keys in case you forget, go to the Keyboard tab and mark the "Show Keyboard & Character Viewers in menu bar" checkbox. When you click on the keyboard layout icon in the Status Menu you will see the "Show Character Viewer" and "Show Keyboard Viewer" options.


Keyboard Layout for Another Language


1. Go to System Preferences > Language & Region.


2. Select + to add another language.
3. Once you select a language and choose which language will be the default, you will be asked to add an input source; the keyboard layout you will use for that language.


4. If you select the "Keyboard Preferences" button (see step 1 image above) you can add or remove different keyboard options for that language.
5. You can choose from different Input modes and modify Caps lock action and Typing method among other options.


6. To make it easier to switch between language keyboards, select the "Show input menu in menu bar" checkbox.
7. The added language keyboard will show up in the Status Menu with any options you checked in Keyboard Preferences.


Now you can switch to a different language and keyboard by simply selecting it from the status menu.

Friday, January 15, 2016

Mac OS X Screen Capture

How to take screen shots:

Capture entire screen: Cmd-Shift-3 (⌘⇧3)

Capture part of screen: Cmd-Shift-4 (⌘⇧4)
  • drag crosshair pointer to select the area
  • hold Shift (⇧) or Option (⌥) while you drag to resize selection
  • to cancel, press Esc before releasing mouse button
Capture specific window: Cmd-Shift-4 (⌘⇧4)
  • press Space bar
  • move camera pointer over window to highlight it, then click
For more flexible options including waiting a specified time to take screenshot, use the Grab app. Access it one of these 3 ways:
  • From Finder window, Applications > Utilities > Grab.app
  • Launchpad > Other > Grab
  • Spotlight, Cmd-Space bar (⌘Space bar) > Grab
See Mac keyboard shortcuts for more.

YouTube 5.1 Channel Audio Fail in Browsers

Ignore any blog posts or YouTube videos that claim to show you how to play 5.1 surround from YouTube videos in a browser. They don’t work. A...