You can sign a PDF document using a signature created by Adobe Reader or you can scan in your actual signature and re-use it for any documents that need signing. You can even create multiple versions of your signature. Here's how.
1. Download and install Adobe Reader if you haven't already.
2. Open the document in Adobe Reader and select "Fill & Sign" in the right sidebar.
3. Select "Sign" in the toolbar at the top. If you haven't created a signature yet, it will prompt you for one. Let's assume you haven't created one yet.
4. Write a signature. Using the selections at the top, you can type it, draw it with your mouse, provide a scanned image of your signature, or even use your laptop camera to scan one in that you wrote on a piece of paper. When you're done, select "Apply".
5. Your signature will appear on the document. Move it where you want with your mouse and click when done.
6. A box will show around the signature with a handle in the lower-right corner that you can drag to make the signature bigger or smaller. When it's sized they way you want, click somewhere outside the box. Don't worry if you don't get it right. You can adjust the size and location by clicking on the signature again. Changing the location is as simple as placing the mouse cursor inside the box until a cross-haired cursor appears, then clicking and dragging the signature where you want.
7. Once you have clicked outside the box another cursor appears allowing you to place printed text anywhere on the page, for example a printed name or date. Move the cursor where you want to type and click. A box will appear for you to enter text into. You can change the size of the text by clicking on the smaller or larger "A" above your text.
8. When everything looks right, save the document or select Save As to save it as another name.
9. Now you can send an email back to the requestor and attach the saved document with your signature.
Monday, July 11, 2016
Creating PDF Documents With Signatures
Creating a PDF document with a place for a signature is easy. This example shows how to do it with Microsoft Word. It's just as easy in Google Docs. Just 3 steps.
1. Create the document in Microsoft Word or some other word processor that can save as PDF. You can use Google Docs too.
2. Save it as a PDF.
In Word, navigate to Save As... > PDF.
In Google Docs, navigate to File > Download as > PDF Document (.pdf)
3. Email it with instructions on how to sign it.
1. Create the document in Microsoft Word or some other word processor that can save as PDF. You can use Google Docs too.
2. Save it as a PDF.
In Word, navigate to Save As... > PDF.
In Google Docs, navigate to File > Download as > PDF Document (.pdf)
Wednesday, March 30, 2016
Not Great: Yahoo Developer Network (YDN)
Here are some reasons why:
1. The Yahoo Developer documentation website takes forever (minutes) to display, if it even does. Mostly it doesn't and this is what you'll see instead:
Maybe they could spin up a second server to host their website so more than a dozen people can access it at a time. Or is that more than the number of developers interested in building Yahoo apps?
2. You can't set or change API permissions on your application after you've created it. This is what the page looks like if you haven't selected API permissions when you set it up.
When you select the "Update" button, it says "updating..." then comes back with the happy message "Your application has been successfully updated." Updated with what? It never gave me any options to select. It's not a big deal to delete the app and start over again, but it's not obvious either.
3. No support. There doesn't seem to be any place to let them know that their YDN server (servers?) is (are?) not displaying content, nor do they ask for feedback. There's a FaceBook page and a Twitter account where you could presumably post a message or a tweet, but really?
Build stuff, ignore feedback...where have I seen that before? Oh yeah, the big Detroit automakers until the Japanese showed them how to build better cars. Buy some copies of The Machine That Changed The World and learn about lean manufacturing, Yahoo. Better yet, read up on Agile Development; you know, that thing that all the successful software businesses are doing?
Hmmm... I wonder why Yahoo is divesting itself of its web businesses.
Friday, March 25, 2016
Show Hidden Folders in Finder
Show Specific Folder
Mac OS X hides many directories so they can't be seen in Finder even though you can navigate to them in Terminal.
To make a hidden directory visible in Finder, open a Terminal window and enter:
sudo chflags nohidden DIRECTORYNAME
DIRECTORYNAME is the directory you want to unhide. This will also unhide all child directories of that directory.
To hide the directory from Finder:
sudo chflags hidden DIRECTORYNAME
For more, see How to view Root directory and subdirectories in Finder?
Show All Hidden Folders
You can show all hidden folders in Finder by opening a Terminal window and entering the following:
defaults write com.apple.finder AppleShowAllFiles YES killall Finder
The "killall Finder" command kills finder which then restarts automatically. The alternative to issuing this command is logging out and logging in again.
To hide them all again:
defaults write com.apple.finder AppleShowAllFiles NO killall Finder
You can also use AppleShowAllFiles TRUE or FALSE.
For more, see How to show hidden files and folders in Mac OS X Finder
Thursday, February 18, 2016
Find Tomcat Version
The Tomcat browser user interface displays the version at the top. If it's running locally, you can usually reach it at localhost:8080.
To find the version of Tomcat from the command line:
From Command Line
To find the version of Tomcat from the command line:
java -cp {tomcat home directory}/lib/catalina.jar org.apache.catalina.util.ServerInfo
The result will look like:Server version: Apache Tomcat/7.0.52 Server built: Feb 13 2014 10:24:25 Server number: 7.0.52.0 OS Name: Mac OS X OS Version: 10.11.3 Architecture: x86_64 JVM Version: 1.7.0_75-b13 JVM Vendor: Oracle CorporationIf Tomcat is running, you can use this script to show its version. It looks for Tomcat among the running processes and uses the command line options specified (catalina.base or catalina.home) when it was started to find the home directory.
#!/bin/bash
# If Tomcat is running, display its version.
#
# This script looks for Tomcat among running process and locates its
# home directory from the command line options specified when it was
# started, either in catalina.base or catalina.home.
#
# Trick: use grep "[c]atalina.base" and awk "[c]atalina.base" so the
# regular expression won't match itself and return 2 results.
# "grep [c]atalina.base" does not match the string "grep [c]atalina.base".
# Try doing "ps -ef | grep catalina.base" and see that it returns 2 results.
# Try doing "ps -ef | grep [c]atalina.base" and see that it returns 1 result.
TOMCAT_DIR=`ps -ef | grep "[c]atalina.base" | awk -F "[c]atalina.base=" '{print $2}' | cut -d ' ' -f 1`
if [ -z "$TOMCAT_DIR" ]; then
TOMCAT_DIR=`ps -ef | grep "[c]atalina.home" | awk -F "[c]atalina.home=" '{print $2}' | cut -d ' ' -f 1`
if [ -z "$TOMCAT_DIR" ]; then
echo "Tomcat does not appear to be running."
echo -e "If you know where the Tomcat home directory is, you can find the version by running:\n"
echo -e "java -cp {tomcat home directory}/lib/catalina.jar org.apache.catalina.util.ServerInfo\n"
exit 1
fi
fi
echo -e "Tomcat is running.\n"
echo -e "Home directory: $TOMCAT_DIR\n"
java -cp $TOMCAT_DIR/lib/catalina.jar org.apache.catalina.util.ServerInfo
Remember to make the file executable with "chmod a+x filename".
Thursday, February 4, 2016
Apple Mac Keyboard
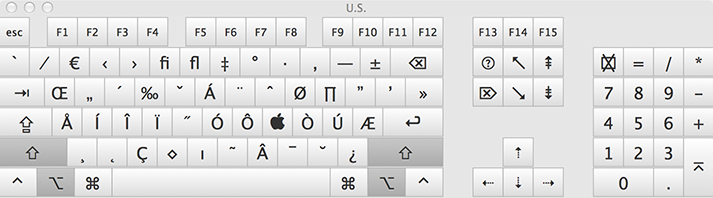
MacBook Pro Layout (U.S.)
You can see these layouts on your Mac using Show Keyboard Viewer in the keyboard menu. See "Add Keyboard Layouts" below for how to set this up.
![]() |
| Default MacBook Pro U.S. Keyboard Layout |
![]() |
| shift pressed |
![]() |
| fn key pressed |
![]() |
| option (alt) key pressed |
![]() |
| shift + option (alt) pressed |
104-Key Layout (U.S.)
![]() |
| Default Apple 104-Key U.S. Layout |
![]() |
| shift pressed |
![]() |
| option (alt) pressed |
![]() |
| shift + option (alt) pressed |
Add Keyboard Layouts
To add other keyboard layouts in your default language:
2. On Input Sources tab, select + to add another keyboard layout.
3. To simplify switching keyboard layouts when editing, mark the "Show Input menu in menu bar" check box. This will show a language and keyboard icon in the Status Menu (right side of menu bar at the top). Click on it to switch keyboard layouts and see other options.
4. To show the layout of keys in case you forget, go to the Keyboard tab and mark the "Show Keyboard & Character Viewers in menu bar" checkbox. When you click on the keyboard layout icon in the Status Menu you will see the "Show Character Viewer" and "Show Keyboard Viewer" options.
1. Go to System Preferences > Language & Region.
2. Select + to add another language.
3. Once you select a language and choose which language will be the default, you will be asked to add an input source; the keyboard layout you will use for that language.
4. If you select the "Keyboard Preferences" button (see step 1 image above) you can add or remove different keyboard options for that language.
5. You can choose from different Input modes and modify Caps lock action and Typing method among other options.
6. To make it easier to switch between language keyboards, select the "Show input menu in menu bar" checkbox.
7. The added language keyboard will show up in the Status Menu with any options you checked in Keyboard Preferences.
Now you can switch to a different language and keyboard by simply selecting it from the status menu.
Keyboard Layout for Another Language
1. Go to System Preferences > Language & Region.
3. Once you select a language and choose which language will be the default, you will be asked to add an input source; the keyboard layout you will use for that language.
5. You can choose from different Input modes and modify Caps lock action and Typing method among other options.
7. The added language keyboard will show up in the Status Menu with any options you checked in Keyboard Preferences.
Monday, February 1, 2016
Jackson UnrecognizedPropertyException
For complicated APIs, I use the XJC binding compiler included with JAXB to generate Java classes using the XSD schema of the XML results of a web service. This is a huge time saver.
For JSON results, there isn't a standard binding compiler to generate Java classes but since JSON and XML are almost interchangeable, I generate the Java classes the same way and fix the differences after the classes have been compiled.
One common error I get is an "unrecognized field" because of the slight differences between XML and JSON representations of data.
For example, I got this error:
and this CounryType class:
The GeonamesType class is the root-level class generated and annotated automatically with the JAXB XJC shell script. For more on XJC, see http://www.thoughts-on-java.org/generate-your-jaxb-classes-in-second/.
The XJC shell script is used to generate Java classes from an XSD schema file. The XSD schema file can be generated automatically from sample XML with any number of online XML schema generators, for example this one: http://www.freeformatter.com/xsd-generator.html.
The error is telling me that the root-level node in the returned JSON, "geonames", doesn't have a correspondingly-named property in the root-level class, GeonamesType. In the class, its name is "country". The class was generated with xjc from the XML version of the result returned from the web service, which looks like this:
In the XML version, geonames is a list of country objects, which is how it is represented in the Java classes. In the JSON version, geonames is an array (list) of objects, but the objects aren't named. I could fix this by renaming "country" in the GeonamesType class to "geonames" like this:
This solves the problem for JSON results, but it doesn't work anymore for the XML results.
By modifying the original GeonamesType class (at the top) with a Jackson annotation that is specific to JSON, it is possible to use the same Java classes for both XML and JSON versions of the results.
Just add the @JsonElement annotation to the country property to tell Jackson that the name of the element in the JSON result will be "geonames", not "country", like this:
For JSON results, there isn't a standard binding compiler to generate Java classes but since JSON and XML are almost interchangeable, I generate the Java classes the same way and fix the differences after the classes have been compiled.
One common error I get is an "unrecognized field" because of the slight differences between XML and JSON representations of data.
For example, I got this error:
com.sun.jersey.api.client.ClientHandlerException: org.codehaus.jackson.map.exc.UnrecognizedPropertyException: Unrecognized field "geonames" (Class org.learn.ws.model.jaxb.api.geonames.org.postal.countryinfo.types.GeonamesType), not marked as ignorable
when unmarshalling this JSON:
to this GeonamesType class:
{
"geonames": [
{
"numPostalCodes": 7,
"maxPostalCode": "AD700",
"countryCode": "AD",
"minPostalCode": "AD100",
"countryName": "Andorra"
},
{
"numPostalCodes": 20260,
"maxPostalCode": "9431",
"countryCode": "AR",
"minPostalCode": "1601",
"countryName": "Argentina"
}
...lots more rows...
]
}
import javax.xml.bind.annotation.XmlAccessType;
import javax.xml.bind.annotation.XmlAccessorType;
import javax.xml.bind.annotation.XmlType;
import java.util.ArrayList;
import java.util.List;
@XmlAccessorType(XmlAccessType.FIELD)
@XmlType(name = "geonamesType", propOrder = {
"country"
})
public class GeonamesType {
protected List<countrytype> country;
public List<countrytype> getCountry() {
if (country == null) {
country = new ArrayList<countrytype>();
}
return this.country;
}
}
@XmlAccessorType(XmlAccessType.FIELD)
@XmlType(name = "countryType", propOrder = {
"countryCode",
"countryName",
"numPostalCodes",
"minPostalCode",
"maxPostalCode"
})
public class CountryType {
@XmlElement(required = true)
protected String countryCode;
@XmlElement(required = true)
protected String countryName;
@XmlElement(required = true)
protected String numPostalCodes;
@XmlElement(required = true)
protected String minPostalCode;
@XmlElement(required = true)
protected String maxPostalCode;
public String getCountryCode() {
return countryCode;
}
public void setCountryCode(String value) {
this.countryCode = value;
}
public String getCountryName() {
return countryName;
}
public void setCountryName(String value) {
this.countryName = value;
}
public String getNumPostalCodes() {
return numPostalCodes;
}
public void setNumPostalCodes(String value) {
this.numPostalCodes = value;
}
public String getMinPostalCode() {
return minPostalCode;
}
public void setMinPostalCode(String value) {
this.minPostalCode = value;
}
public String getMaxPostalCode() {
return maxPostalCode;
}
public void setMaxPostalCode(String value) {
this.maxPostalCode = value;
}
}
The XJC shell script is used to generate Java classes from an XSD schema file. The XSD schema file can be generated automatically from sample XML with any number of online XML schema generators, for example this one: http://www.freeformatter.com/xsd-generator.html.
The error is telling me that the root-level node in the returned JSON, "geonames", doesn't have a correspondingly-named property in the root-level class, GeonamesType. In the class, its name is "country". The class was generated with xjc from the XML version of the result returned from the web service, which looks like this:
<?xml version="1.0" encoding="UTF-8"?>
<geonames>
<country>
<countryCode>AD</countryCode>
<countryName>Andorra</countryName>
<numPostalCodes>7</numPostalCodes>
<minPostalCode>AD100</minPostalCode>
<maxPostalCode>AD700</maxPostalCode>
</country>
<country>
<countryCode>AR</countryCode>
<countryName>Argentina</countryName>
<numPostalCodes>20260</numPostalCodes>
<minPostalCode>1601</minPostalCode>
<maxPostalCode>9431</maxPostalCode>
</country>
...lots more rows...
</geonames>
@XmlAccessorType(XmlAccessType.FIELD)
@XmlType(name = "geonamesType", propOrder = {
"geonames"
})
public class GeonamesType {
protected List<countrytype> geonames;
public List<countrytype> getCountry() {
if (geonames == null) {
geonames = new ArrayList<countrytype>();
}
return this.geonames;
}
}
Use Same Classes With XML And JSON
By modifying the original GeonamesType class (at the top) with a Jackson annotation that is specific to JSON, it is possible to use the same Java classes for both XML and JSON versions of the results.
Just add the @JsonElement annotation to the country property to tell Jackson that the name of the element in the JSON result will be "geonames", not "country", like this:
import org.codehaus.jackson.annotate.JsonProperty;
import javax.xml.bind.annotation.XmlAccessType;
import javax.xml.bind.annotation.XmlAccessorType;
import javax.xml.bind.annotation.XmlType;
import java.util.ArrayList;
import java.util.List;
@XmlAccessorType(XmlAccessType.FIELD)
@XmlType(name = "geonamesType", propOrder = {
"country"
})
public class GeonamesType {
@JsonProperty(value = "geonames")
protected List<countrytype> country;
public List<countrytype> getCountry() {
if (country == null) {
country = new ArrayList<countrytype>();
}
return this.country;
}
}
Now the classes work for both the XML and JSON results as shown above.
Subscribe to:
Posts (Atom)
YouTube 5.1 Channel Audio Fail in Browsers
Ignore any blog posts or YouTube videos that claim to show you how to play 5.1 surround from YouTube videos in a browser. They don’t work. A...
-
For complicated APIs, I use the XJC binding compiler included with JAXB to generate Java classes using the XSD schema of the XML results of...
-
I use a MacBook Pro with a leftover Dell 102-key PC keyboard. For almost everything it works great. Even the volume keys work. However, the ...
-
If you get " Expected elements are (none) " in a javax.xml.bind.UnmarshalException, you probably don't have an @XmlRootElement...